Lenovo T480 (Maximized)
⚠️ Safety First
Before starting, please read our SPI Programmer Best Practices guide for essential safety information and programmer recommendations.
EC note: If you need to update or customize the EC (keyboard remaps, battery policies, thermal/power behaviour, etc.), see the EC firmware & customizations section in the Prerequisites. EC updates and customizations must be applied through the vendor BIOS/update package prior to the initial Heads flash.
T480 Hardware Maintenance Manual
Accessing and flashing the BIOS chip on a T-series machine has never been easier. The process is straightforward and takes approximately 10 minutes.
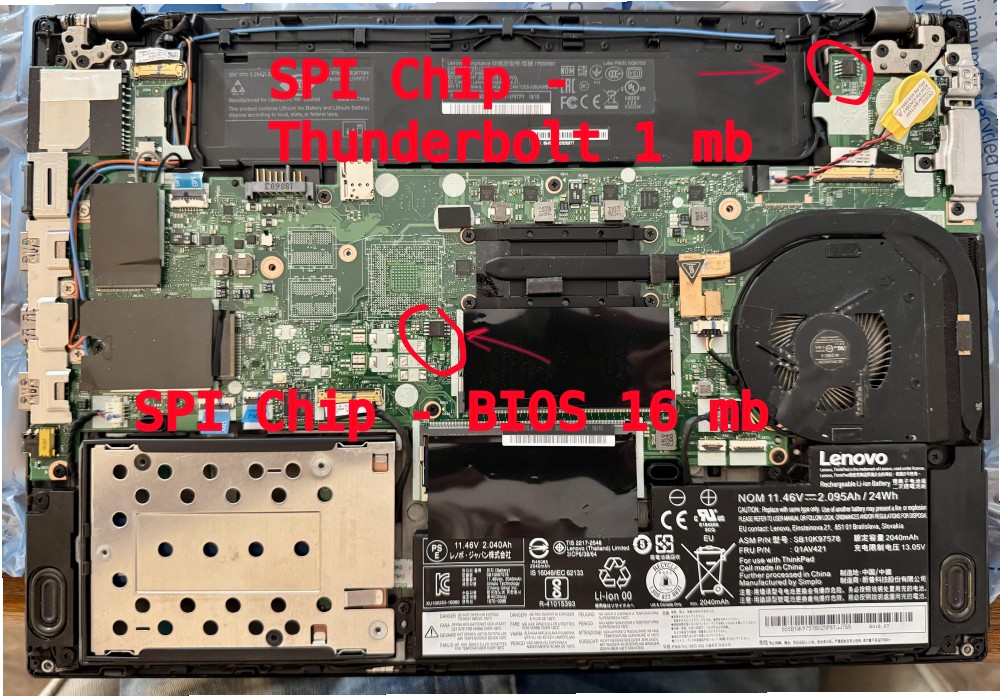
The ThinkPad T480 has two SPI flash chips important for the port. The first chip holds the BIOS, ME, etc., while the second holds the Thunderbolt firmware. To access these chips, you only need to remove the back panel, which is secured by six screws.
Critical: Remove all batteries (including CMOS) AND disconnect the AC adapter before starting.
For whole procedure you will need:
- A Phillips screwdriver +1 (PH1), which is standard for most laptop screws.
- A recommended SPI programmer (see our Best Practices guide)
- Other laptop/PC with a Linux-based OS installed.
- Optional: A plastic guitar pick or an old credit card to help detach the bottom case from the clips holding it in place. Otherwise, it can be difficult to remove, increasing the risk of breaking the tabs or the top part of the bottom case above the battery connector.
There is still debate over which programmer and software should be used (flashprog vs. flashrom). Before following this guide, make sure you read README.md and the related information.
Some ThinkPad T480 units on the used market are affected by an Intel bug in the Thunderbolt firmware. In short, the flash chip becomes full, causing Thunderbolt fast charging to stop working, though slow charging still functions. This issue can also affect the USB-C port. For convenience, Heads provides a fixed and padded Thunderbolt firmware that resolves the “charging problem” if your laptop is affected. Board testers did not encounter this issue, and it is unlikely to occur if your laptop was in use for more than 12 months before flashing. If you do experience the “charging bug,” it is possible to fix it with external flashing. Also, the update is possible prior flashing heads using fwupd from a Linux distribution
Please note that as of March 2025, Thunderbolt data transfer is not supported upstream by coreboot. However, video output through Thunderbolt and charging still work. This means only the USB-C charging port can be used for data transfer.
Flashing Heads
First, remove the batteries and disconnect the power cable from your device. Removing the screws will allow you to remove the back panel. A guitar pick or an old credit card can be helpful for detaching the panel.
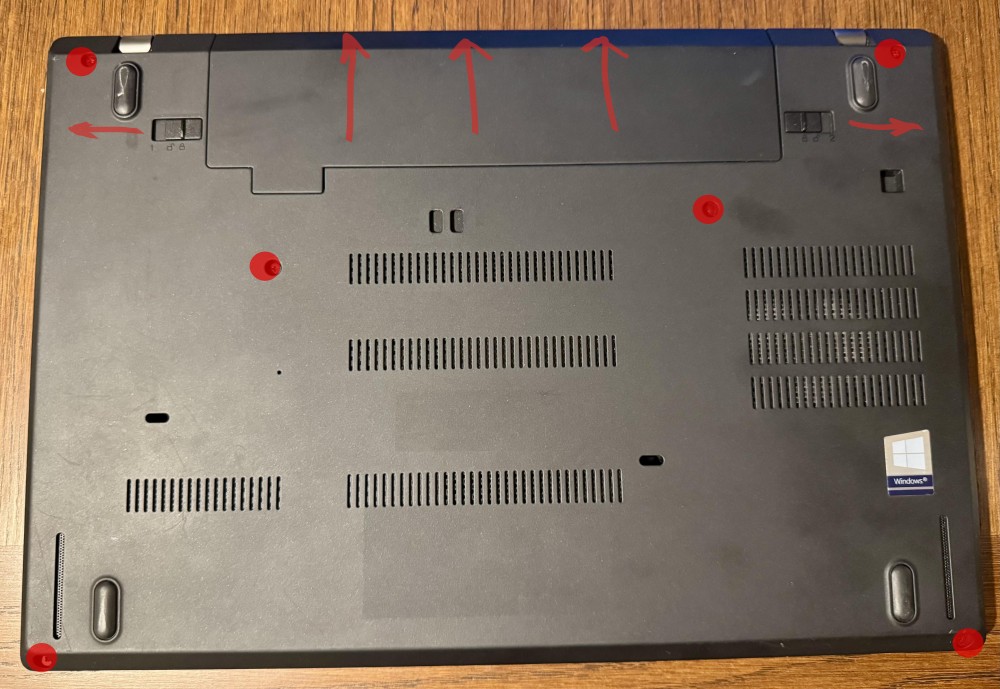
The back panel and the batteries are removed. Important, ensure that all batteries, including the CMOS battery, are disconnected. Arrows indicate the direction you should pull the connectors. Pull the plastic part, not the wires, as the wires are thin and can be damaged.

The top-right chip corresponds to the Thunderbolt SPI flash chip (1 MB). The chip located in the middle of the board corresponds to the BIOS (16 MB) chip, respectively.
The chip located in the middle of the board contains the Intel Management Engine (ME) firmware.
First download or build (please see general building / building x230) the board rom for this board and verify its hash value.
Try to read the name of the SPI flash chip. The dot on the chip helps to identify the correct clip orientation.
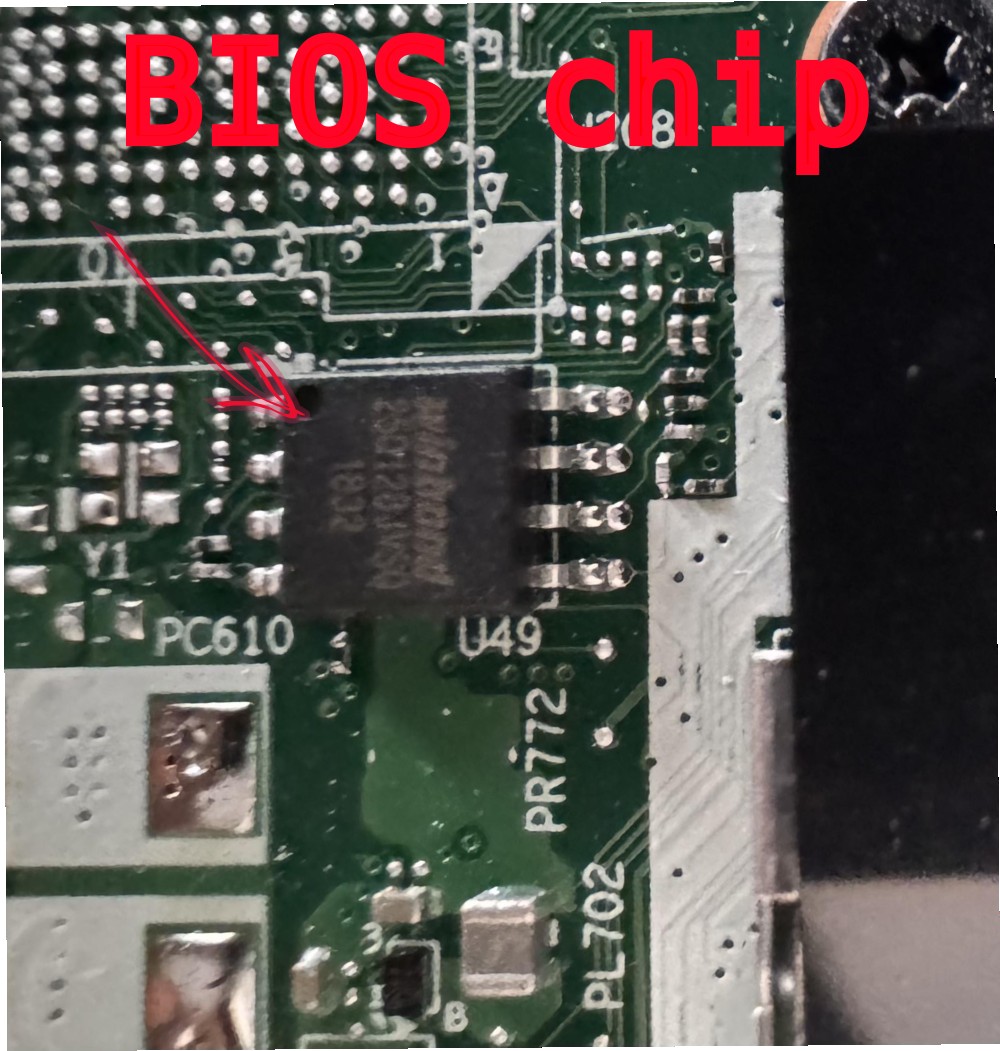
First, connect the clip of your SPI programmer to the chip (see the SPI Programmer Best Practices guide for recommended hardware and example commands). Next, connect the programmer to the USB port of your other Linux-based computer with flashrom installed. In my setup, the red wire should be where the dot is (the dot indicates pin 1). Here, please also see the flashing guide for the T430.
Note: For initial reflashing steps that involve customizing the EC while still on proprietary firmware (for example to preserve or alter EC features), see the X230 reflashing notes and building guidance for detailed instructions and cautions. Use flashrom to check the chip you are connected to:
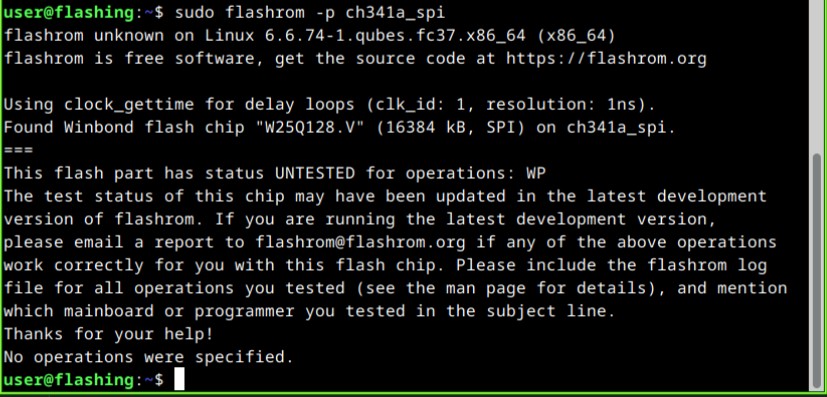
sudo flashrom --programmer [programmer]
Here is my output.
Create a backup and verify it (where the name of the flash chip is YYY):
sudo flashrom --programmer [programmer] --read ~/t480_original_bios.bin --chip YYY
# Quick sanity check: inspect the start of the dump for obvious garbage
hexdump -C ~/t480_original_bios.bin | head -20
sudo flashrom --programmer [programmer] --verify ~/t480_original_bios.bin --chip YYY
First output can be seen here. 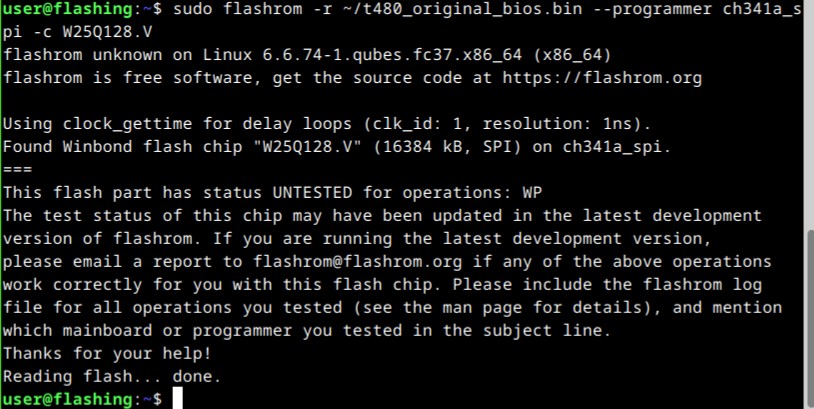
sudo flashrom --programmer [programmer] --read ~/t480_original_bios_1.bin --chip YYY
Second output can be seen here. 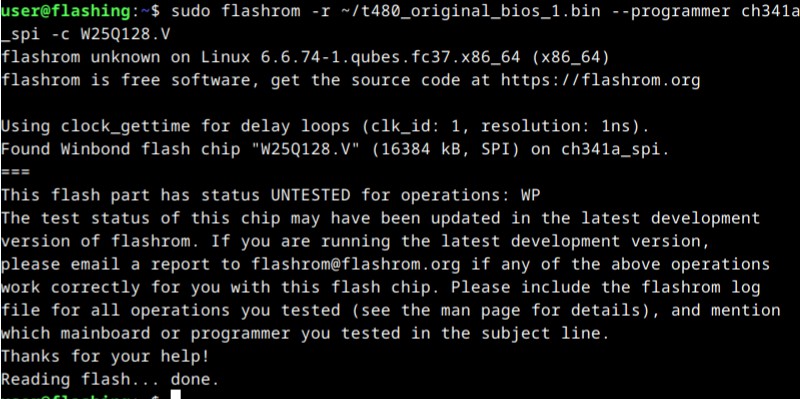
Make sure that the dump matches the chip content. If this is the case, the output of the following command will state Verifying flash... VERIFIED
sudo flashrom --programmer [programmer] --verify ~/t480_original_bios.bin --chip YYY
Make sure that files do not differ.
If the dumps look consistent, proceed (visual comparison shown above).
Alternative comparison is bit-by-bit. If the files are the same, there should be no output of this command. Otherwise, you will see a bit-by-bit difference between the files.
diff <(hexdump -C t480_original_bios.bin) <(hexdump -C t480_original_bios_1.bin)
If the files differ or the chip content does not match the dump, try reconnecting your programmer to the SPI flash chip and make sure your flashrom/flashprog software is up-to-date.
If they are the same, then write T480-hotp-maximized.rom to the SPI flash chip:
sudo flashrom --programmer [programmer] --chip YYY --write ~/heads/build/x86/T480-hotp-maximized/T480-hotp-maximized.rom
Note about GBE: The T480 includes a GBE region (board MACs) inside the Intel Firmware Descriptor (IFD). Always back up the full chip before the initial flash and inspect the dump (for example, hexdump -C ~/bios-backup.bin | head -20).
If you want to preserve a board’s MAC/GBE value, the recommended, reliable approach is to create a custom GBE during the Heads build (see the boards/<boardname> configuration in linuxboot/heads). For details on preserving board-specific regions, consult the SPI Programmer Best Practices guide and the board’s build documentation, and refer to issue #120 for community discussion.
Here is a successful attempt. Be patient, it may take a while. 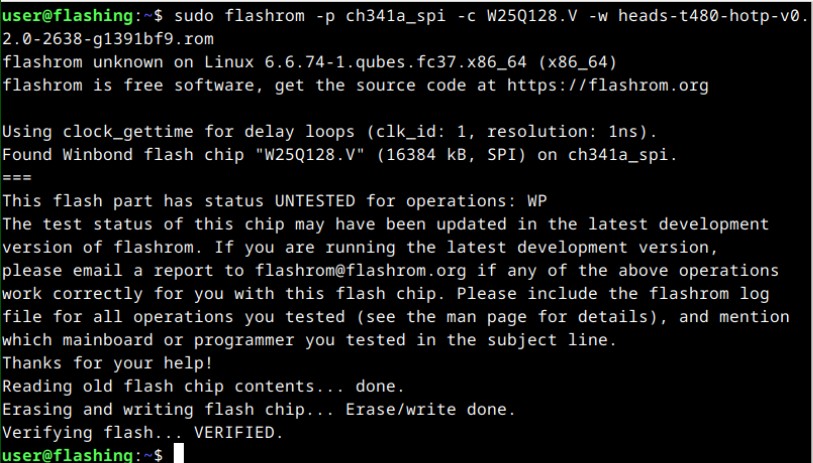
If all goes, well you can connect the batteries, press the power button and you should see the keyboard LED flash. After that, Heads will boot into its GUI.
Two reboots are sometimes needed after flashing. Force a power off by holding the power button for 10 seconds. Since the memory training data was wiped by the content of the fully flashed ROM, this is normal.
You should then follow through with configuring keys.
Flash Thunderbolt firmware
Important, ensure that power supply and all batteries, including the CMOS battery, are disconnected. After connecting the clip to the Thunderbolt chip as shown in the figure above read from the chip, making sure the connection is stable. The procedure is similar to the flashing Heads on the SPI chip. Therefore, comments are skipped.
sudo flashrom --programmer [programmer] --read ~/t480_original_tb.bin --chip YYY
# Quick sanity check: inspect the start of the dump for obvious garbage
hexdump -C ~/t480_original_tb.bin | head -20

sudo flashrom --programmer [programmer] --read ~/t480_original_tb_1.bin --chip YYY
# Quick sanity check: inspect the start of the dump for obvious garbage
hexdump -C ~/t480_original_tb_1.bin | head -20

sudo flashrom --programmer [programmer] --verify ~/t480_original_tb.bin --chip YYY

# Bit-by-bit comparison:
diff <(hexdump -C t480_original_tb.bin) <(hexdump -C t480_original_tb_1.bin)
Flash the padded Thunderbolt firmware. The firmware file tb.bin is located in the blobs folder after you build the Heads locally, or in the CircleCI artifacts.
sudo flashrom --programmer [programmer] --chip YYY --write ~/tb.bin
Done.