Lenovo X230 (Maximized)
Table of contents
⚠️ EOL: No microcode updates
This board’s CPU generation has reached End of Servicing Updates. See per-board EOL/ESU status for ESU dates and Heads threat model for security implications.
✅ PROTECTED: TPM GPIO Reset
Pre-Skylake platform — dedicated PLTRST# pin, not GPIO-shared. See Per-Board Protection Status, TPM GPIO Reset Vulnerability.
Hardware Compatibility
Hardware: x230, x230-fhd_edp, x230-usb_kb — see the Hardware Compatibility List.
⚡ Safety First
Before starting, please read our SPI Programmer Best Practices guide for essential safety information and programmer recommendations.
X230 Hardware Maintenance Manual
X230 Tablet Hardware Maintenance Manual
Disassembly
→ Libreboot X230 external flashing guide (disassembly photos, dual-chip ROM splitting)
→ Ivybridge/Haswell common guide (vendor file injection, MAC address, pre-flash checks)
The X230 has two SPI flash chips: one 4 MB (BIOS + reset vector) and one 8 MB (ME firmware + flash descriptor). The Heads maximized image is a combined ROM that must be split for external flashing:
dd if=heads-x230-maximized.rom of=top.rom bs=1M count=4
dd if=heads-x230-maximized.rom of=bottom.rom bs=1M skip=4
Flash the 4 MB chip with top.rom and the 8 MB chip with bottom.rom.
Disassembly steps
Start by removing the battery and disconnecting the AC power. Remove all screws from the bottom of the machine marked with a keyboard/touchpad indicator.
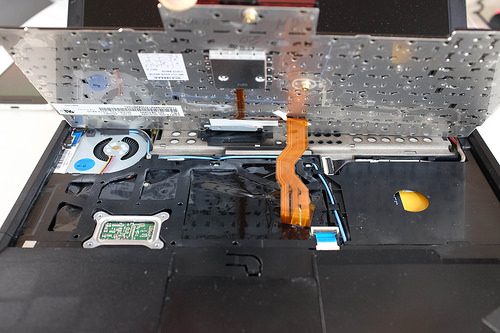
Pry up the keyboard and separate it from the palmrest. The keyboard is connected to the motherboard by a ribbon cable which easily detaches. (The keyboard only needs to be removed so that the palm rest can be removed. After removing the palm rest, you can put the keyboard back.)
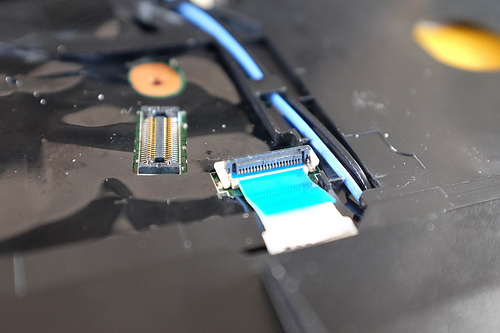
The palm rest is also connected to the motherboard by a ribbon cable held by a small latch. Undo the latch, then lift the palm rest off.
Pull up the black plastic cover on the bottom right of the palm rest area to reveal the two SOIC SPI flash chips.
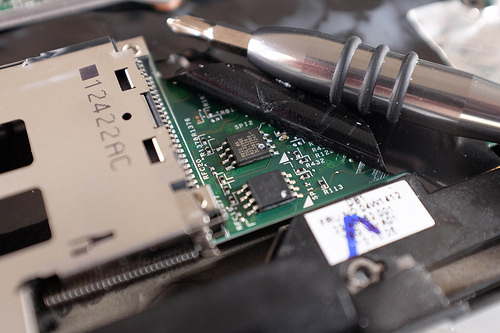
The top chip (closer to the CPU) is 4 MB — this holds the BIOS and reset vector. The bottom chip is 8 MB and holds the Intel Management Engine (ME) firmware plus the flash descriptor.
Based on the work done here, the chips should be one 4M and one 8M of the following:
| Vendor | Device | size |
|---|---|---|
| Eon | EN25QH32 | 4M |
| Eon | EN25QH64 | 8M |
| Macronix | MX25L3206E / MX25L3208E | 4M |
| Macronix | MX25L6405, MX25L6405D, MX25L6406E / MX25L6408E, MX25L6436E / MX25L6445E / MX25L6465E / MX25L6473E / MX25L6473F, MX25L6495F | 8M |
| Micron/Numonyx/ST | N25Q032..1E, N25Q032..3E | 4M |
| Micron/Numonyx/ST | N25Q064..1E, N25Q064..3E | 8M |
| Winbond | W25Q32.V, W25Q32.W | 4M |
| Winbond | W25Q64.V, W25Q32.W | 8M |
Preparing the ROM
First download / build the maximized board ROMs (top and bottom) for this board and verify their hashes.
Initial BIOS step: Before attempting ME cleaning or SPI flashing, upgrade the proprietary BIOS to the latest upgradeable vendor release for your platform. For the X230 the latest upgradeable BIOS is version 2.76 (download: g2uj32us.iso) installed without EC signature verification; note that newer vendor firmwares may restrict hardware changes (for example, newer versions prevent swapping an X220 keyboard into an X230). If you need to customize the EC firmware while still running proprietary platform firmware, see the EC firmware & customizations section in the Prerequisites.
EC note: For EC reflashing or custom EC behavior (keyboard remaps, battery policies, etc.) see the EC firmware & customizations section in the Prerequisites — EC changes should be applied from vendor firmware prior to initial Heads flashing.
Flashing
Flashing the top (4 MB) chip
Try to read the name on the top SPI flash chip. Then, connect the clip and SPI programmer to the top SPI flash chip.
Note: See the SPI Programmer Best Practices for programmer recommendations (Tigard recommended; CH347F preferred budget option; CH341A rev1.6+ acceptable with a physical selector). The commands below use [programmer] as a placeholder; see the SPI Programmer Best Practices guide for example commands for specific programmers.
Use [flasher] of your choice (flashrom or flashprog – see Tool Interchangeability) with the programmer you selected ([programmer] – see Programmer Selection):
sudo [flasher] --programmer [programmer]
Find the chip and create a backup and verify it (For me the SPI flash chip is YYY):
sudo [flasher] --programmer [programmer] --read ~/top.bin --chip YYY
# Quick sanity check: inspect the start of the dump for obvious garbage
hexdump -C ~/top.bin | head -20
sudo [flasher] --programmer [programmer] --verify ~/top.bin --chip YYY
If the files differ then try reconnecting your programmer to the SPI flash chip and make sure your flashrom/flashprog software is up to date.
If they are the same then write x230-maximized-top.rom to the SPI flash chip:
sudo [flasher] --programmer [programmer] --chip "YYY" --write ~/heads/build/x86/x230-maximized/x230-maximized-top.rom
Flashing the bottom (8 MB) chip
Try to read the name on the bottom SPI flash chip. Then, connect the clip and SPI programmer to the bottom SPI flash chip. Use [flasher] (flashrom or flashprog – see Tool Interchangeability) to check the chip that you are connected to:
sudo [flasher] --programmer [programmer]
Find the chip and create a backup and verify it (For me the SPI flash chip is ZZZ):
sudo [flasher] --programmer [programmer] --read ~/bottom.bin --chip ZZZ
# Quick sanity check: inspect the start of the dump for obvious garbage
hexdump -C ~/bottom.bin | head -20
sudo [flasher] --programmer [programmer] --verify ~/bottom.bin --chip ZZZ
The 8M bottom chip contains the ME firmware. It is neutralized in maximized version. You can flash it specifying the same chip you found under ZZZ:
sudo [flasher] --programmer [programmer] --chip "ZZZ" --write ~/heads/build/x86/x230-maximized/x230-maximized-bottom.rom
If all goes well, you should see the keyboard LED flash, and within a second Heads will boot in its GUI.
Two reboots are sometimes needed after flash. Force power off by holding the power button for 10 seconds. Since the memory training data was wiped by the content of the full flashed ROM, this is normal.
You should then follow through with configuring keys.